Back in 2008, an Apple retail store was looking to organize some items used by their creative team in the store. These items included digital keyboards, microphones, webcams, iPods, etc. (The creative team is responsible for teaching customers how to use Apple’s creative software; GarageBand, Final Cut, etc.; basically any applications dealing with music and video.) I wasn’t given a direction other than the cabinet “needed to have big drawers and it had to be white.” I had a timeline of about 4 days to complete the cabinet.
Apple Retail Cabinet
The cabinet starts as a box built out of 3/4″ plywood.
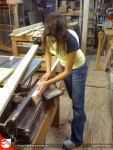
Because of the timeline, I got the family involved on this project! Raime, my girlfriend, is cutting pieces of pine that will be used to make the face frame of the cabinet.
Raime joints the edges to make sure the edges are a perfect 90 degrees.
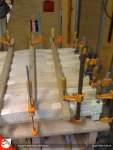
The face frame is installed and held in place by clamps while it dries.
The drawers will be made from plywood too…..they won’t be seen unless you open them so aesthetics is not an issue here.
These pieces are also made of pine and will be used to construct the ribs for the side panels of the cabinet.
Using a special jig made just for this project, we will cut each rib so in the end, they are all identical. It is crucial for the ribs to be the same so that we have absolutely no warping in the plywood that will go on next.
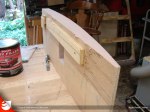
All ribs are glued into place and a box is established in the middle. This will later serve as the cavity for the apple logo that will be cut into the surface to add depth to the overall design.
Here, we are applying clamping cauls so that we have even distribution of pressure on all the ribs. Again, this helps avoid any potential warping.
The clamps will be removed after an hour. The white stuff is a resin glue.
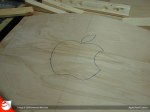
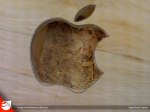
I begin by drawing the apple logo to the side panel. I will use this process on both side panels, both drawers, and the door.
I cut the Apple logo out with a Bosch jigsaw.
Here’s a view of the backside of the panel. The inside of the box will have a thin layer of Bondo applied to make it as seamless as possible.
The Bosch Multi-X is a perfect tool to sand the inside of the box.
I also add a thin coat of Bondo in places where the plywood and pine meet. I want the pieces to look like they are solid, without the appearance of layers.
This is the apple logo that will act as a drawer pull for the two front drawers. I begin by drawing the Apple logo on the surface.
Drilling a series of small holes helps to maneuver the jigsaw around tight radiuses and avoid pinching the blade.
There are lots of saw marks on the pieces of wood that make up the inside of the box. Apparently somebody forgot to remove these before installation! Oh well….some additional Bondo work is needed.
Bondo has been applied and now it needs to be sanded.
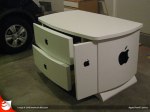
One of the drawer faces. This will be mounted to one of the plywood drawers seen in one of the earlier pics in the gallery.
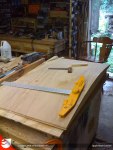
A test fit of the drawer faces to make sure everything is in place.
The base of the cabinet is seen here. This is what the main part of the cabinet will sit on. A thin layer of 1/4″ luan plywood is used, but it flexes way too much. I need to stiffen it up, otherwise the potential for damage is increased. Hmmmm….what to use….?
Before I figure out a way to stiffen arc on the base, I’ll apply a thin coat of bond to fill in any voids.
A view from the underside.
I decided to use cotton to stiffen up the base.
I saturate the cotton fabric in resin glue and apply it to the underside. I make sure to smooth out any air bubbles for the next 15 minutes or so. This will ensure that it bonds to the plywood. The same process is used to make wooden tambour doors, the kind usually seen on breadboxes in the kitchen.
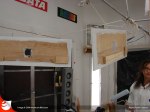
Testing the side panels to make sure they fit.
Unfortunately, there are some minor issues with alignment. Here, my dad is running the panels over the jointer to eliminate excess material.
Somebody, who shall remain nameless, dropped the door and put a minor defect in the back side. A little bit of patching and the door will be good as new!
Raime is the lucky one who gets to begin painting the different parts of the cabinet.
She begins by rolling a white primer coat of paint over the surface.
Just some more test fitting of the cabinet….everything seems to going great!
So finally, the cabinet is finished. This pic is a little dark, but the cabinet actually is white.
Concept image supplied for approval. Rendered in Cinema 4D.
Concept image supplied for approval. Rendered in Cinema 4D.
Concept image supplied for approval. Rendered in Cinema 4D.
Concept image supplied for approval. Rendered in Cinema 4D.